
Reverse Manufacturing: 3D Scanning For Molds Printing.
- Borrow2Share

- Nov 6, 2023
- 8 min read
Updated: Nov 9, 2023
Doing Reverse Manufacturing & Engineering Instead. Not The Usual Order Usual Engineering & Manufacturing.
Not Suggesting Knock-Offs?! 3D Scanning For Molds Printing. But, To Scan And Sketch Along. To Follow 'n Learn From The Master's 'Brush Stroke'. A 3D Scanner Can Be An Invaluable Tool For CAD By Importing The Sophisticated, Organic Surfaces and Also The Complex Ergonomic Curves.
By Integrating 3D Scanning To The 3D Printing Workflow, You Can Copy the Shape, Form, Size Of Any Physical Object. Designs/Parts Replication, Reconstruction, and Restoration. Reverse Engineering and Then Further The Development.
"3D scanning and 3D printing workflows can be applied to replication and restoration, reverse engineering, to integrate 3D scanners into your 3D printing workflow to elevate your product development process."
How To Choose a 3D Scanner For 3D Printing
(Ref: https://formlabs.com/blog/how-to-choose-a-3d-scanner-for-3d-printing/ )
Important Excerpts Below:
A 3D Scanner expands the capabilities of a 3D Printer, allowing you to Replicate the Shape of almost any Physical Object. Together, These Two Technologies create A Powerful Digital Workflow that can simplify and sophisticate processes in a range of industries.
Combining 3D Scanning and 3D Printing. To do a 3D digital scan first of physical object and then for a 3D print reconstruction of object.
How To Choose a 3D Scanner?
1. First Consider Your Object Size.
2. Next, Determine The Accuracy and Resolution You Need In Your Scan.
3. Last, Choose The Right 3D Scanner That Fits Your Object Size, Accuracy, and
Resolution Requirements.
Choose the Best 3D Scanner for the Object Size. Small, Mid, and Large Objects.
The 3D Scanner's Scan Volume & Coverage Area.
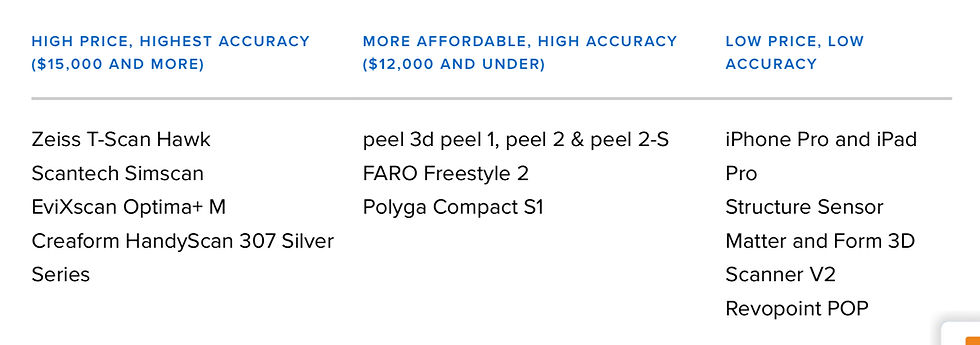
Find a Scanner that fits your Object Size, Accuracy, and Resolution requirements without too much overhead. Cost typically increases with Scan Volume.
3D Scanner Models. Portable Handheld vs. Stationary Desktop.
3D Scanning Technologies. Five Scan Technology Types. Their Pros and Cons.
Laser Triangulation
Structured Light Scanners
Depth-Sensing Cameras
Photogrammetry
LiDAR Sensors
3D scanning and 3D printing workflows can be applied to replication and restoration, reverse engineering, to integrate 3D scanners into your 3D printing workflow to elevate your product development process.
Users should expect additional work in their CAD Software to remove any gaps in the Generated Scan Mesh of their Object from their 3D Scanner. The Digital Scan Mesh gets imported into CAD Software for Touch-Ups and also to Convert Into a 3D Solid Model. The 3D Solid Model can be then be sliced for sending it to a 3D Printer.
(The Digital Scan Mesh output'ed from a 3D Scanner can't be edited nor sliced for sending to a 3D Printer.)
With accuracy in the range of 0.1 mm or better, Laser and Structured Light scanners are a good fit for professional applications and alongside High-Resolution 3D Printers.
Formlabs Stereolithography (SLA) Resin 3D printers (such as the Form 3+) can produce parts at a similar accuracy and with a similar printable area, comparable to the scan volume of many desktop 3D scanners.
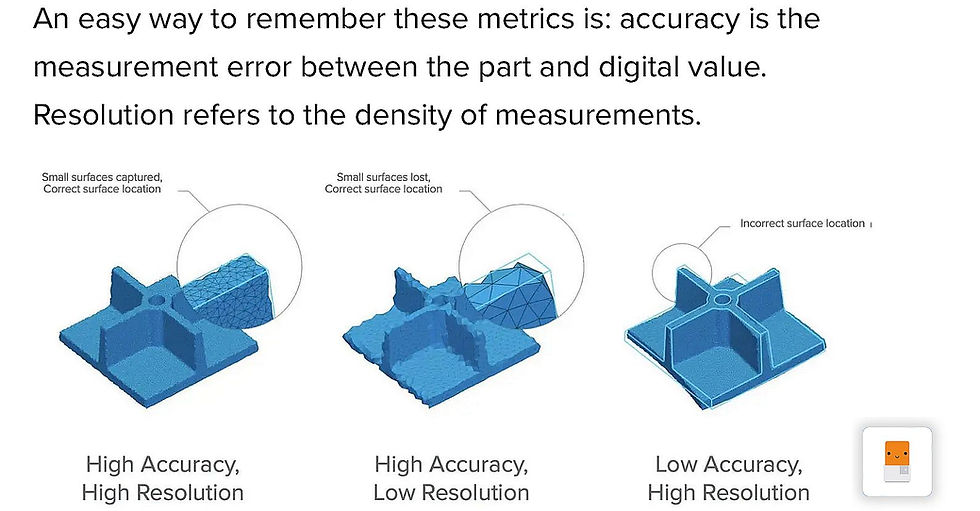
Scanner Accuracy & Resolution. Their Definition and The Difference.
Besides the Accuracy - between the measured digital point and the actual physical point location,
Scanners also vary in terms of Resolution - which is the distance between the captured digital points (at a given scan distance).
This means that details on the scanned object that are smaller than the scanner’s resolution won’t be captured.
For example, a highly accurate 3D scanner with a lower resolution might detect the general shape of jewelry on a statue, but not clearly show the individual details on a ring or necklace. Depending on your project requirements, this may or may not be a dealbreaker.
An easy way to remember these two metrics is: Accuracy is the Measurement Error between the Part and Digital Value. Resolution refers to the Density of the measurements.
Handheld vs. Desktop Scanners:
The Accuracy of Handheld Scanners depends on the distance to the subject (and the quality of scan reconstruction), while Desktop Scanners have Consistent Accuracy within the Constrained Scan Volume. If you are considering buying a 3D scanner for precise measurement, make sure to compare like to like.
Handheld scanners can be manually moved around the object and have fewer size constraints than desktop models.
High-End handheld scanners have an even wider range, and fill the niche for All Objects that require precise measurements, but cannot fit in a desktop scanner. Only High-End handheld scanners.
Handheld scanners are also able to capture objects nearly instantaneously, which makes them well-suited for taking human measurements (where the subject is not perfectly still) for ergonomics and medical applications.
3D Scanning Technologies Comparisions:
In general, Structured Light scanning provides the best resolution and accuracy when compared to Laser scanning. For some artistic use-cases for 3D scanning you may need a lot of detail, while overall accuracy is less important — especially if you don’t require your part to fit precisely with other parts in an assembly. In these cases, Photogrammetry is an excellent low-cost option to explore.
Both Depth-Sensing Cameras and Photogrammetry are a good solution for scanning Large Objects in order to create 3D printed scale models and also offer enough accuracy for capturing the Shape of the Human Body.
Several entry-level Laser scanners are available using technology similar to higher-end systems. These scanners are a great way to start replicating small objects at 1:1 scale.
As one would expect, the accuracy of entry-level Laser 3D scanners is lower than a high-end scanner, but they can easily provide enough detail to replicate small decorative objects and figures where accuracy is not critical.
Two Types Of Object Models: A 3D Scan Mesh vs. A 3D Solid Model
There is a Big Difference Between a Scan Mesh vs a Solid Model!
3D Scanners Only Produce A Scan Mesh (Surfaces of Object)! Not A 3D Solid Model of the Object.
Only CAD Softwares Can Produce the 3D Solid Models of Objects. For 3D Printing.
The output from a 3D scanner is a mesh of triangles representing the surface of an object at a real-world scale. In some cases, the scan can be used directly to replicate objects without any CAD software work.
3D Scanners create Surface Meshs Of Objects that can’t be edit or printed. They need to be converted to Editable Solid Models in CAD Software. Once converted, the Solid Model that can be edited, sliced, and then printed.
If the area of the model can’t be seen by the scanner, it will cause a gap in the model. You can automatically repair small missing sections with most scan software programs to create a 3D printable model.
However, repaired holes are rarely accurate to the original object. For parts that demand close to perfect accuracy, auto-repair of gaps or holes will not be sufficient. Use the MeshMixer software to edit and repair 3D Scan Meshes for 3D printing.
The 3D Scan Mesh Should Be “Watertight”. ie. Scan Mesh can hold water. Before the "Watertight" Scan Mesh can be converted to an Editable Solid Model.
Higher cost scanners will be able to capture small objects and create highly-detailed meshes that don’t require significant touch-ups in CAD software. Handheld scanners are also often on the higher end of the price range, due to their portable nature. The low-cost scanning market offers a wide range of options, but you have to know what to look for.
Many scanners use turntables to increase what the scanner can see. The sophistication of a scanner’s turntable affects how easily and completely the object is captured: some scanners have the ability to move the object around multiple axes, imaging the object from more angles. This feature is important when reverse engineering plastic parts with deep recesses and ribs, which are impossible to capture from a single angle.
Scanners may rotate the object to capture occluded areas. Red regions are occluded and will be missing in the scan. Areas with deep relief are difficult for a single axis turntable to fully capture due to occlusion.
Handheld scanners are also often on the higher end of the price range, due to their portable nature. The low-cost scanning market offers a wide range of options, but you have to know what to look for.
Use this flowchart to determine what scanner you need based on Accuracy, Resolution, Scan Volume, and Budget.

Building a Digital Workflow With 3D Scanning and 3D Printing
A hybrid workflow can also be powerful, where CAD solid models are combined with Scanned 3D Scan Meshs. For example, customized ergonomics capture a physical imprint of a part of the human body, and integrate them with a mechanical design.
3D scanners are also valuable tools for measuring the accuracy of manufactured objects. Many factors affect 3D Print accuracy, and metrology-grade 3D scanners provide a clear picture of how a material performs for demanding applications.
A Variety of Powerful Workflows are enabled by Combining a 3D Printer and a 3D Scanner:
* Reverse engineering to create replacement parts, products with custom ergonomics, and more.
* Replication and restoration of parts, especially in art and jewelry.
* Consumer audio for creating custom earpieces.
* Dental and medical applications, and how 3D scanning is enabling patient-specific workflows.
* Metrology to validate and measure the accuracy of manufactured objects.
Learn How To Pair 3D Scanning and 3D Printing to Empower a Variety of Workflows in Engineering, Product Design, and More.
___________________________________________________________________________________
How To Use 3D Scanning and 3D Printing For Reverse Engineering
(Ref: https://formlabs.com/blog/how-to-use-3d-scanning-and-3d-printing-for-reverse-engineering/ )
Important Excerpts Below:
Reverse engineering is a powerful way to create digital designs from a physical part, and can be a valuable tool in your prototyping toolkit.
3D scanners measure complex objects very quickly, and can speed up your design workflow tremendously when real-life references are involved. With the ability to capture and modify physical shapes, you can design 3D printed parts that fit perfectly on existing products of all kinds.
From Physical to Digital: Meshes and Solids
One of the biggest challenges people encounter when converting physical objects to digital is a major incompatibility between two different types of 3D models: meshes and solids.
A 3D scanner outputs a mesh, rather than a constructive “solid” model. Meshes need to be touched up and converted to be made into editable solid models.
Meshes are the main output of all 3D scanners, and the format commonly understood by 3D printers (STLs). A mesh represents the surface of a shape with a large number of triangles, connected edge to edge. Mesh models don’t contain any information about the object, besides the position of the numerous triangles that define the surface shape.
The ways you can alter a mesh model are limited — CAD software like Solidworks and Onshape can’t directly modify meshes. If you need to make major modifications to the underlying design of a scanned part, the scan mesh needs to be converted to a CAD solid model.
For example, you can create replacement parts that match the original design of damaged existing pieces, or use to integrate the complex surfaces from existing objects into your CAD software design.
1. Touch-up the Scan Mesh
Some scanners produce extremely large mesh files, which will make later steps grind to a halt.
Scanner software repairs small gaps and simplifies the scan, making the data more manageable in CAD software. Try to reduce the scan mesh as much as possible without destroying important details.
If you need more control, Meshmixer is a great choice for refining scanned meshes.
2. Import the Scan Mesh to CAD Software.
Import the mesh into CAD software equipped with reverse engineering tools. Geomagic for Solidworks is a powerful choice for resurfacing complex, organic scan meshes.
There are Three Paths to Extract the Shape of the Scan Mesh in order to Create a Solid Model in CAD Software:
(a) Semi-Automatic Surfacing. (b) Automatic Surfacing. And (c) Manual Sketching/Redrawing.
3. Create 3D Solid Model From Scan Mesh.
So to Extract Complex, Organic Surfaces and Curved Lines to Create the Editable Solid Model.
Using the imported scan mesh as a sketching/drawing guide.
And once the scan mesh has been converted to a solid model, it can be subtracted from another solid body to create a jig that securely holds the original part.
4. Put the 3D Solid Model into 3D Slicer Software.
Creates the G-Code Instructions to send to 3D Printer for printing.


Comments